Adobe Captivate isn’t just eLearning software; it’s a portal to creating seriously engaging online courses. Think interactive quizzes that actually make learning fun, branching scenarios that personalize the experience, and simulations so realistic, students will forget they’re not in a real-world situation. We’re diving deep into all its features, from the basics to the seriously advanced stuff, showing you how to build awesome eLearning experiences that’ll leave your students wanting more.
Table of Contents
This guide covers everything from setting up your first project to mastering advanced techniques like using variables and JavaScript. We’ll explore how to publish your creations for web, mobile, and LMS platforms, ensuring your courses are accessible to everyone. Plus, we’ll tackle common troubleshooting issues and share some killer case studies to inspire your own eLearning masterpieces.
Adobe Captivate’s Core Features
Adobe Captivate is a powerful eLearning authoring tool that allows you to create engaging and interactive online courses, simulations, and assessments. It’s a go-to for many instructional designers because of its robust feature set and relatively intuitive interface, especially compared to some of its more technically demanding competitors. This makes it a good choice for both beginners and experienced eLearning developers.
Captivate’s core strength lies in its ability to seamlessly blend various media types into a cohesive learning experience. It offers a comprehensive suite of tools for creating visually appealing and interactive content, making it ideal for delivering diverse learning materials.
Types of eLearning Content Created with Adobe Captivate
Captivate empowers the creation of a wide array of eLearning materials. You can build everything from simple linear tutorials to complex branched scenarios and simulations. This versatility is a key advantage.
Examples include:
- Software Simulations: Step-by-step guides showing users how to navigate software applications, complete with interactive elements.
- Interactive Videos: Videos enhanced with quizzes, clickable hotspots, and branching scenarios based on viewer choices.
- Branching Scenarios: Learning experiences that adapt to user responses, providing different pathways based on their decisions.
- Microlearning Modules: Short, focused lessons ideal for delivering bite-sized information and reinforcing key concepts.
- Compliance Training: Courses designed to meet regulatory requirements, often incorporating assessments and tracking features.
- Game-Based Learning: Interactive modules that incorporate game mechanics to enhance engagement and knowledge retention.
Comparison to Other eLearning Authoring Tools
Compared to tools like Articulate Storyline 360, Captivate shines in its robust video editing capabilities and its strong simulation creation features. Storyline excels in its ease of use for creating branching scenarios and complex interactions, but might feel less intuitive for those working heavily with video. Lectora, another popular choice, is known for its robust quizzing features and its ability to integrate with learning management systems (LMS), but may lack some of the visual polish and ease of interactive video integration that Captivate provides.
The best choice depends on your specific needs and project requirements.
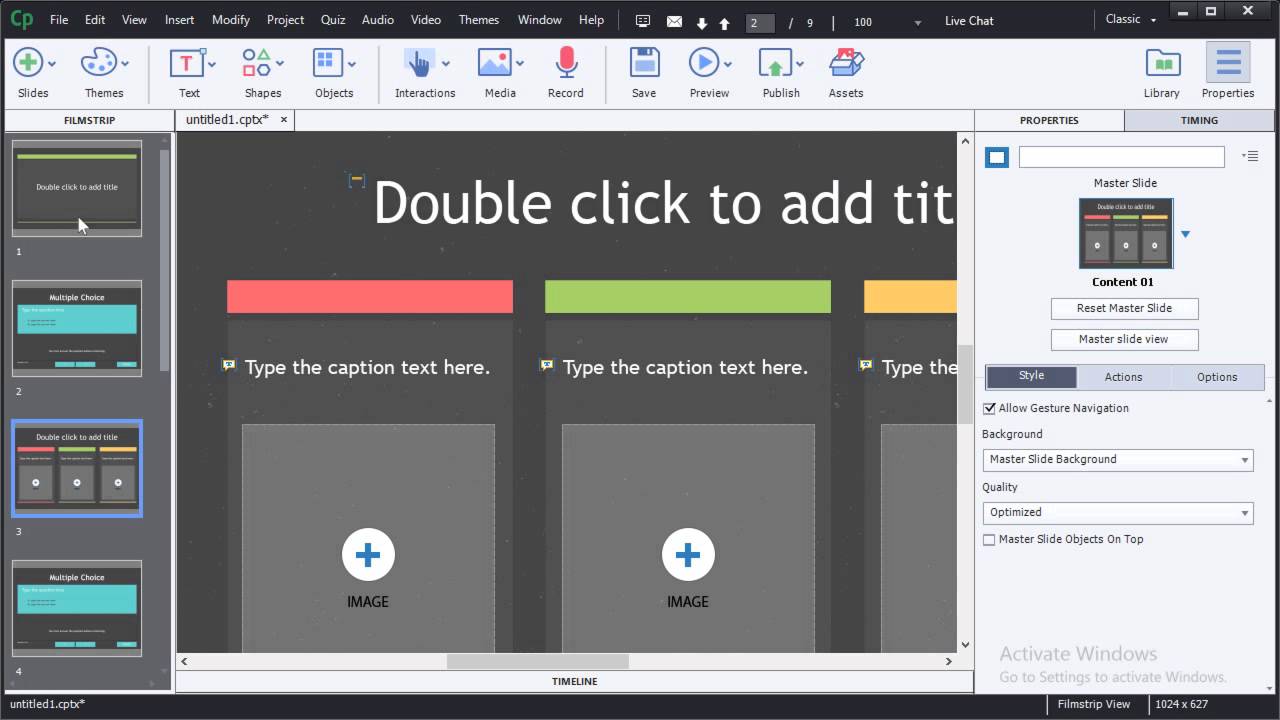
Adobe Captivate’s User Interface and Workflow
The Captivate interface is generally considered user-friendly, even for those new to eLearning authoring tools. The software employs a timeline-based approach, similar to video editing software. This allows users to easily add and arrange content elements, such as text, images, videos, and interactive objects. The software offers a library of pre-built templates and assets to speed up the development process.
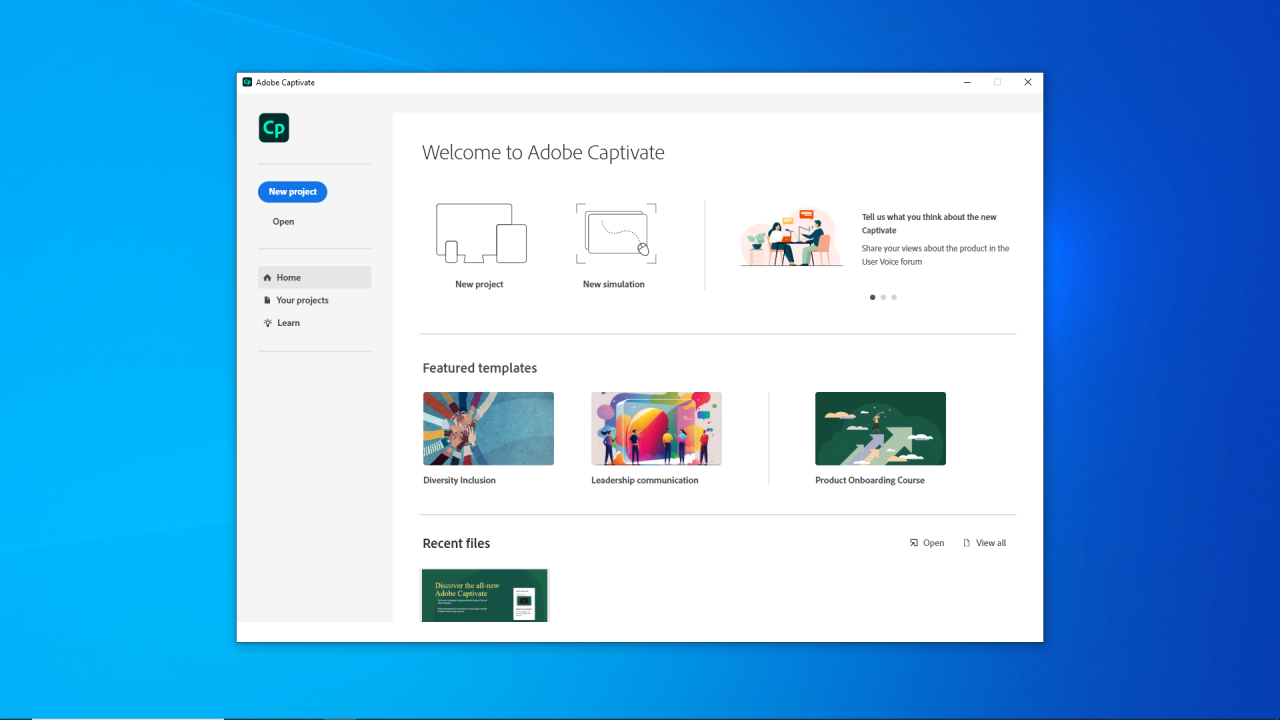
A typical workflow involves:
- Project Setup: Defining the project’s dimensions, theme, and initial settings.
- Content Creation: Adding text, images, videos, and interactive elements to the slides.
- Interaction Design: Creating quizzes, branching scenarios, and other interactive elements.
- Testing and Refinement: Previewing the course and making adjustments as needed.
- Publishing: Exporting the course in various formats, such as HTML5, SCORM, or AICC, for use in an LMS.
Creating Interactive Content with Adobe Captivate

Okay, so we’ve covered the basics of Captivate. Now let’s dive into making your eLearning actuallyengaging*. Interactive content is key to keeping learners hooked and ensuring knowledge retention. We’ll explore how Captivate’s tools help you achieve this.
This section details how to build interactive quizzes, branching scenarios, simulations, and seamlessly integrate multimedia. Think of it as your toolbox for transforming static content into dynamic learning experiences.
Interactive Quiz Creation
Captivate makes designing quizzes a breeze. You can easily create various question types, like multiple-choice, true/false, fill-in-the-blank, and even more advanced options. Providing immediate feedback is crucial; it reinforces correct answers and helps learners understand their mistakes. Let’s look at an example:
Imagine a quiz on project management. One question could be: “What is the critical path in a project?” The correct answer would be “The longest sequence of tasks determining the shortest possible project duration.” Incorrect answers might include options like “The shortest task sequence” or “The most expensive task sequence”. For each answer, you’d provide feedback.
For the correct answer, you might display: “Correct! Understanding the critical path is essential for effective project management.” For incorrect answers, you could offer something like: “Incorrect. The critical path is defined by the longest sequence of dependent tasks, affecting the overall project timeline.”
Branching Scenarios for Personalized Learning
Branching scenarios are awesome for creating personalized learning paths. Based on a learner’s responses or actions within the module, Captivate can direct them down different paths. This allows for tailored feedback and content, making the learning experience more relevant and effective.
For example, in a software training module, a learner might be asked to perform a specific task. If they complete it correctly, they move on to the next section. If they make a mistake, Captivate could redirect them to a remedial section explaining the task in more detail or providing additional practice exercises before allowing them to proceed.
Simulations and Games in eLearning
Captivate lets you build interactive simulations and games to make learning fun and memorable. This is especially useful for teaching complex processes or procedures where hands-on experience is valuable. Think of a flight simulator for pilot training or a virtual lab for scientific experiments. While Captivate might not create photorealistic simulations like a dedicated game engine, it can effectively create engaging interactive experiences.
A simple example could be a simulated customer service interaction. The learner interacts with a virtual customer, responding to their questions and concerns. Based on their responses, they receive feedback on their performance, reinforcing best practices in customer service. The gamification aspect could involve points or badges for successful interactions.
Embedding Videos and Multimedia
Integrating multimedia is a must for creating engaging eLearning. Captivate simplifies this process. You can easily embed videos, audio files, images, and interactive content directly into your projects. Think of it as a simple drag-and-drop process.
- Import Assets: Import your video, audio, or image files into your Captivate library.
- Insert into Slide: Drag and drop the asset onto the slide where you want it to appear.
- Adjust Settings: Use Captivate’s built-in tools to adjust the size, position, and playback settings of your multimedia assets. You can also add captions or transcripts for accessibility.
- Test and Refine: Preview your project to ensure the multimedia elements play correctly and enhance the learning experience.
Publishing and Sharing Captivate Projects
Okay, so you’ve built this awesome eLearning masterpiece in Captivate. Now what? Time to get it out there! Publishing your project involves choosing the right format and platform to reach your audience, whether it’s a website, a mobile device, or a learning management system (LMS). Let’s break down how to do it effectively.Publishing your Captivate project involves several key decisions regarding output format, platform compatibility, and LMS integration.
Properly publishing ensures your content is accessible, engaging, and functions as intended across various devices and learning environments.
Publishing to Different Platforms
Publishing options in Captivate are pretty flexible. You can easily output your project for the web (HTML5), mobile devices (iOS, Android), and various LMS platforms. For web publishing, the HTML5 output is generally the best choice for broad compatibility. For mobile, Captivate offers options to create apps for both iOS and Android. When publishing for an LMS, you’ll usually choose a SCORM or xAPI compliant package, ensuring seamless integration with your chosen LMS.
Remember to test thoroughly on target devices after publishing to ensure everything works as expected.
Optimizing Captivate Projects for Various Devices and Screen Sizes
Responsive design is key here. You don’t want your amazing content looking squished or cut off on different screen sizes. Captivate has tools to help with this. You can use features like fluid boxes and responsive layouts to ensure your content scales properly on various devices, from tiny phone screens to large desktop monitors. Think about using scalable images and videos; avoid hard-coding dimensions whenever possible.
Pre-publishing testing on different devices is a must to catch any display issues before they reach your learners. For example, a project designed for a large desktop might have text that’s too small to read on a phone, requiring adjustments to font sizes and layouts.
Captivate Project Output Formats
Captivate offers a range of output formats, each suited for different purposes. HTML5 is the most versatile, working across browsers and devices. For LMS integration, SCORM 1.2, SCORM 2004, and xAPI (Experience API) are common choices. These standards ensure your project interacts properly with the LMS, tracking learner progress and providing reporting features. Other options include AICC and custom output for specific platforms.
The choice of output format depends on the target platform and the level of tracking and interaction required.
Adobe Captivate’s awesome for creating interactive eLearning modules, but sometimes you need to distribute the final product as a PDF. To ensure everyone can view it, make sure you’ve checked compatibility with various pdf reader applications. After all, a smooth viewing experience is key to effective learning, so proper PDF output is crucial for any Adobe Captivate project.
Integrating a Captivate Project with a Learning Management System (LMS)
Getting your Captivate project into your LMS is generally straightforward. After publishing your project in the appropriate format (SCORM or xAPI), you’ll upload the resulting package to your LMS. The exact steps will vary depending on your specific LMS (Moodle, Canvas, Blackboard, etc.), but the process usually involves navigating to a content upload section within the LMS and uploading the Captivate output package.
Once uploaded, the LMS will usually automatically recognize the SCORM or xAPI package and make it available to learners. After uploading, always test the integration to confirm that the LMS properly tracks progress, scores, and other relevant data. For example, if you use a SCORM compliant package, check if the LMS accurately reports completion status and scores back to the instructor.
Accessibility in Adobe Captivate
Making your eLearning accessible isn’t just a good idea—it’s the right thing to do. Accessibility ensures that everyone, regardless of ability, can access and engage with your Captivate projects. This means considering users with visual, auditory, motor, and cognitive impairments. Let’s explore how to make your Captivate creations inclusive and user-friendly for all.
Adobe Captivate offers several built-in features designed to enhance accessibility. These features allow you to create eLearning content that meets WCAG (Web Content Accessibility Guidelines) standards, making your courses usable for a wider audience and improving the overall learning experience.
Captivate’s Accessibility Features and Their Effective Use
Several features within Captivate directly support accessibility. These include options for alternative text for images, closed captions and transcripts for videos, keyboard navigation, and color contrast adjustments. Proper use of these features ensures that your content is perceivable, operable, understandable, and robust.
- Alternative Text for Images: Always provide descriptive alternative text (alt text) for all images. Instead of “image of a graph,” describe the graph’s content: “Bar graph showing sales figures for Q1 2024, with a peak in March.” This allows screen readers to convey the image’s meaning to visually impaired users.
- Keyboard Navigation: Ensure all interactive elements, such as buttons and menu options, are accessible via keyboard navigation. Test thoroughly to verify that users can navigate and interact with the content using only a keyboard.
- Color Contrast: Maintain sufficient color contrast between text and background colors. Use a color contrast checker tool to ensure your text is easily readable for users with low vision. Tools like WebAIM’s contrast checker can help.
- Captioning and Transcribing: All videos should have accurate captions and transcripts. This benefits users who are deaf or hard of hearing, as well as those who prefer to read along with the audio.
Accessibility Compliance Checklist for Captivate Projects
Using this checklist during the design and development phases helps ensure your project meets accessibility standards.
- Alternative Text for all Images and Multimedia: Every non-decorative image and multimedia element requires accurate and descriptive alt text.
- Keyboard Navigation: Verify that all interactive elements are accessible via keyboard navigation alone.
- Sufficient Color Contrast: Use a color contrast checker to ensure adequate contrast between text and background.
- Closed Captions and Transcripts for Videos: Provide accurate captions and transcripts for all videos.
- Structural Markup: Use headings (H1-H6) to structure your content logically. This helps screen readers navigate and understand the content hierarchy.
- Clear and Concise Language: Use simple and straightforward language, avoiding jargon or complex sentence structures.
- Consistent Navigation: Maintain a consistent navigation structure throughout the project, making it easy for users to find information.
- Testing: Thoroughly test your project with assistive technologies such as screen readers (JAWS, NVDA) to identify and fix any accessibility issues.
Creating Captions and Transcripts for Videos
Accurate captions and transcripts are crucial for accessibility. Captivate doesn’t have built-in transcription, but you can use external transcription services or software (like Otter.ai or Trint) to generate transcripts. Then, you can import these transcripts as captions within Captivate. Manually reviewing and correcting the generated captions is essential for accuracy.
Techniques for Making Captivate Projects Accessible to Users with Disabilities
Beyond the built-in features, several design techniques enhance accessibility. These are not Captivate-specific but apply to all digital content creation.
- Provide clear instructions and visual cues: Use clear and concise language, and supplement text with visual cues (icons, symbols) to aid understanding.
- Avoid relying solely on color for conveying information: Use alternative methods (text labels, shapes) to reinforce information conveyed through color.
- Use consistent layout and navigation: A predictable layout makes it easier for users to navigate and find information.
- Use sufficient white space: Avoid cluttered layouts that can be difficult for users with cognitive impairments to process.
Advanced Techniques in Adobe Captivate
Okay, so we’ve covered the basics of Captivate. Now let’s dive into some seriously cool stuff that’ll take your eLearning game to the next level. We’re talking about using Captivate’s power to create truly dynamic and engaging learning experiences. Think beyond simple click-and-reveal interactions – we’re building interactive masterpieces here.
This section will explore advanced techniques to unlock Captivate’s full potential. We’ll look at how variables and advanced actions work together to create dynamic interactions, the magic of JavaScript integration for enhanced functionality, creating responsive designs for seamless viewing across devices, and strategies to optimize your projects for blazing-fast loading times. Get ready to level up your Captivate skills!
Using Variables and Advanced Actions for Dynamic Interactions
Variables and advanced actions are the secret sauce to making your Captivate projects truly interactive. Variables act like containers holding information, which can change based on user actions or other events within the project. Advanced actions are essentially scripts that allow you to manipulate these variables and control the flow of your project in complex ways. For example, imagine a quiz where the user’s score is stored in a variable.
Based on this variable, you could use advanced actions to show different feedback messages (e.g., “Great job!” or “Keep trying!”) or even branch the learner to different sections of the course based on their performance. You can create truly personalized learning paths.
Using JavaScript in Adobe Captivate
Adding JavaScript to your Captivate projects opens a world of possibilities. While Captivate offers robust built-in functionality, JavaScript lets you integrate external libraries or create custom functions to handle tasks that are more difficult or impossible using Captivate’s native features. For instance, you might use JavaScript to integrate with a learning management system (LMS) for seamless tracking of learner progress, or to create complex animations or interactions that are beyond Captivate’s standard capabilities.
Think of it as adding a powerful turbocharger to your Captivate engine.
Creating Responsive Designs
In today’s multi-device world, responsive design is crucial. A responsive eLearning course adapts seamlessly to different screen sizes, from tiny smartphones to large desktop monitors. Captivate provides tools to create responsive projects, allowing you to define breakpoints (screen size thresholds) and adjust the layout and content accordingly. This ensures your course looks and functions flawlessly on any device.
Imagine designing a course that automatically adjusts the size and placement of elements to fit perfectly on a tablet, ensuring a consistent and optimal learning experience.
Optimizing Captivate Projects for Performance
Nobody likes a slow-loading eLearning course. Optimizing your Captivate projects for performance is essential for a positive learner experience. Strategies include compressing images and videos, using efficient animations, and minimizing the use of large multimedia files. Properly optimizing your project will ensure your learners aren’t kept waiting while your content loads, leading to increased engagement and a more positive learning experience.
A well-optimized project also reduces the strain on the learner’s device, improving the overall user experience. For example, replacing high-resolution images with appropriately sized images can dramatically improve loading times.
Adobe Captivate and Software Integration
Adobe Captivate’s power extends far beyond its own interface. Seamless integration with other Adobe Creative Suite applications and various third-party tools dramatically expands its capabilities, allowing for the creation of truly rich and professional eLearning experiences. This section will explore how to leverage these integrations for maximum impact.Integrating Captivate with other Adobe applications streamlines the workflow and enhances the quality of your projects.
The ability to effortlessly import and export assets minimizes time spent on repetitive tasks and ensures design consistency. The versatility offered by these integrations makes Captivate a central hub for multimedia eLearning development.
Importing Assets from Other Software
Importing assets from other software into Adobe Captivate is straightforward. You can bring in high-quality images from Photoshop, crisp vector graphics from Illustrator, and compelling videos edited in Premiere Pro. The process typically involves simply dragging and dropping the asset into your Captivate project or using the standard “Import” function. For example, a beautifully designed button created in Photoshop can be directly imported and used as an interactive element within a Captivate course.
Remember to maintain consistent branding and style across all imported assets for a professional look. Captivate supports a wide range of file formats, making it compatible with many popular design and editing tools.
Integrating with Other Adobe Creative Suite Applications
The Adobe Creative Suite applications work together beautifully. Photoshop is perfect for creating custom graphics and interactive elements, Illustrator is ideal for designing logos and scalable vector graphics, and Premiere Pro is a powerhouse for video editing. After creating these assets, you can easily import them into Captivate to build interactive lessons, simulations, and assessments. For example, you could create a series of animated explainer videos in After Effects, export them as video files, and then incorporate them into a Captivate-based training module.
This collaborative workflow allows for a more efficient and creative eLearning development process.
Using Adobe Captivate with Other Authoring Tools or Platforms
While Captivate is a powerful authoring tool on its own, its ability to interact with other platforms significantly expands its capabilities. For instance, you can export Captivate projects as SCORM packages to integrate them with Learning Management Systems (LMS) like Moodle or Blackboard. This allows for tracking learner progress and providing a seamless learning experience within a structured online environment.
Furthermore, you might use a tool like Storyline for specific aspects of your project and then combine the output with Captivate content, creating a truly hybrid eLearning experience. This flexible approach allows for utilizing the best features of different tools to achieve the optimal learning outcome.
Exporting Captivate Projects in Different Formats
Captivate allows for the export of projects in a variety of formats, catering to different deployment needs. The most common format is SCORM, which is essential for LMS integration. Other options include AICC, HTML5, and even simple video formats like MP4. The choice of export format depends on the target platform and desired level of interactivity. For example, exporting as an MP4 allows for easy sharing on platforms like YouTube, while an HTML5 export ensures broader compatibility across different devices and browsers.
This versatility allows for sharing your eLearning content in various ways, reaching a wider audience.
Troubleshooting Common Captivate Issues
So, you’ve built your amazing eLearning masterpiece in Adobe Captivate, but now you’re facing some…hiccups. Don’t worry, it happens to the best of us! This section will cover some common problems and offer practical solutions to get you back on track. We’ll tackle publishing snags, playback issues, multimedia integration headaches, and accessibility challenges.
Publishing Errors
Publishing your Captivate project can sometimes feel like navigating a minefield. Unexpected errors can pop up, leaving you frustrated and staring at a blank screen. Here are some common culprits and how to address them:
- Error: “Insufficient memory”. This usually means your computer doesn’t have enough RAM to handle the project’s size and complexity. Solution: Close unnecessary programs, increase your virtual memory (if possible), or consider optimizing your project by reducing the size of your media files or simplifying complex interactions.
- Error: “File not found”. This often indicates that Captivate can’t locate a linked asset (image, audio, video). Solution: Double-check the file paths and ensure all linked assets are in the correct location. Relinking the assets might be necessary.
- Error: “Project corrupted”. This is a more serious issue, potentially requiring you to revert to a previous saved version. Solution: Regularly save your project. If you encounter this, try opening a previous autosave file or version. If that doesn’t work, consider contacting Adobe support.
Playback Problems
Your project plays perfectly on your machine, but your learners are reporting issues? Let’s fix that.
- Issue: Audio or video doesn’t play. This could be due to codec issues, incorrect file paths, or corrupted media files. Solution: Ensure you’re using widely compatible media formats (like MP4 for video and MP3 for audio). Verify file paths and try replacing any potentially corrupted media files.
- Issue: Interactions are unresponsive. This can happen due to conflicting scripts or errors in the interaction design. Solution: Carefully review your interaction logic. Test individual interactions to pinpoint the problem area. Sometimes, a simple project restart can help.
- Issue: Project displays incorrectly on different devices or browsers. Captivate projects should be tested across various browsers and devices to ensure compatibility. Solution: Thoroughly test your project on different platforms (desktops, tablets, smartphones) and browsers. This is crucial for accessibility and a positive learner experience.
Multimedia Integration Issues
Integrating multimedia smoothly is key to engaging eLearning.
- Issue: Large video files cause slow loading times. Solution: Optimize video files for web delivery by reducing their size and resolution without significantly impacting quality. Consider using a video compression tool.
- Issue: Audio and video synchronization problems. Solution: Ensure the audio and video files are correctly aligned in your Captivate project. If using external audio, check for any timing discrepancies.
Accessibility Challenges
Creating accessible content is essential.
- Issue: Lack of alt text for images. Solution: Always provide descriptive alt text for all images to make your content accessible to visually impaired learners using screen readers.
- Issue: Poor color contrast. Solution: Ensure sufficient color contrast between text and background to improve readability for learners with visual impairments. Use a color contrast checker tool to verify compliance with accessibility guidelines.
Common Error Messages and Solutions
Sometimes, Captivate provides specific error messages. Here are a few examples:
| Error Message | Possible Solution |
|---|---|
| “Could not publish to this location” | Check file permissions and ensure you have write access to the chosen output folder. |
| “Invalid file format” | Ensure you’re using supported file types for images, audio, and video. |
| “Unexpected error occurred” | Try restarting Captivate and your computer. If the problem persists, consider reinstalling Captivate or contacting Adobe Support. |
Case Studies of Effective Captivate Projects
Adobe Captivate’s power lies not just in its features, but in its ability to create engaging and effective eLearning experiences. Examining successful projects reveals best practices and showcases how Captivate addresses real-world training challenges. This section will explore several case studies, highlighting design choices, impact, and areas for improvement.
Successful E-Learning Project: Onboarding New Sales Representatives
One company, a rapidly growing SaaS startup, used Captivate to create an engaging onboarding program for their new sales representatives. The program, designed as a series of interactive modules, covered product knowledge, sales techniques, and company culture. Each module incorporated interactive simulations, branching scenarios based on user choices, and quizzes to reinforce learning. The design focused on a clean, modern aesthetic with consistent branding throughout.
Key features included personalized learning paths, allowing reps to focus on areas where they needed extra support, and progress tracking, allowing managers to monitor individual performance. The impact was significant: a 20% increase in sales representative productivity within the first quarter, attributed to the improved onboarding experience. The interactive simulations, in particular, proved highly effective in helping reps develop practical sales skills.
Solving Real-World Learning Challenges with Captivate
Captivate’s ability to create highly customized learning experiences addresses many real-world challenges. For example, a large manufacturing company used Captivate to develop safety training modules. These modules featured interactive 360° videos of the factory floor, allowing trainees to virtually navigate the environment and identify potential hazards. This approach significantly improved safety awareness and reduced workplace accidents. Another example is a healthcare provider who used Captivate to create patient education materials.
The interactive modules explained complex medical procedures in an easily understandable way, leading to improved patient compliance and reduced anxiety. These examples demonstrate Captivate’s versatility in addressing diverse training needs across various industries.
Analysis of a Captivate Project: Strengths and Weaknesses, Adobe captivate
A financial institution used Captivate to develop a compliance training program. The project’s strength lay in its comprehensive coverage of regulations and its use of realistic scenarios to test understanding. However, the program’s length (over three hours) and somewhat dry presentation style were weaknesses. Trainees reported feeling overwhelmed and disengaged. This highlights the importance of balancing comprehensive content with engaging design and appropriate pacing.
A shorter, more modular approach, with more frequent interactive elements, could have significantly improved the learning experience. The project could also have benefitted from incorporating gamification elements, such as points and leaderboards, to increase motivation and engagement.
Effective Use of Captivate by a Company: XYZ Corporation
XYZ Corporation, a global technology company, effectively uses Captivate for various training and development initiatives. They leverage Captivate’s capabilities to create engaging and interactive training programs for their employees worldwide. Their programs are known for their high-quality visuals, intuitive navigation, and effective use of assessments to gauge understanding. XYZ’s success with Captivate stems from their commitment to developing well-structured, engaging content and consistently evaluating and refining their programs based on trainee feedback.
This continuous improvement approach ensures that their training remains relevant, effective, and engaging for their diverse workforce.
Future Trends in eLearning Authoring with Adobe Captivate
Adobe Captivate, a stalwart in the eLearning authoring tool landscape, is poised for exciting developments. The rapid evolution of technology and pedagogical approaches necessitates continuous adaptation, and Captivate’s future hinges on its ability to embrace these changes. We’ll explore the potential trajectory of this powerful software, considering emerging trends and technological advancements that will likely shape its next iterations.
The future of eLearning authoring tools like Adobe Captivate is inextricably linked to the broader trends in educational technology. The increasing demand for personalized, engaging, and accessible learning experiences is driving innovation across the board. Simultaneously, technological advancements in areas like artificial intelligence (AI), virtual reality (VR), and augmented reality (AR) offer unprecedented opportunities to enhance the learning process.
These factors will profoundly influence how Captivate evolves and the types of learning experiences it facilitates.
AI-Powered Personalization and Adaptive Learning
AI is expected to play a significant role in shaping the future of Adobe Captivate. Imagine a Captivate project that dynamically adjusts its content and pacing based on individual learner performance. This adaptive learning approach, powered by AI algorithms, could analyze learner responses, identify knowledge gaps, and personalize the learning path accordingly. For example, a Captivate module teaching a complex software program could automatically provide additional tutorials or practice exercises based on the learner’s struggles with specific features.
This level of personalization ensures that each learner receives the optimal support needed to master the material, leading to increased engagement and improved learning outcomes. This isn’t just theoretical; platforms like Khan Academy are already using AI for personalized learning recommendations, and we can expect similar features to integrate deeply within authoring tools like Captivate.
Enhanced VR/AR Integration for Immersive Learning
The integration of virtual and augmented reality (VR/AR) technologies is another significant trend influencing eLearning authoring. While current VR/AR integrations in Captivate are nascent, we can anticipate more robust features in future versions. Imagine creating interactive 3D simulations within Captivate, allowing learners to explore complex environments and manipulate virtual objects. A medical student could practice surgery in a virtual operating room, a mechanic could diagnose engine problems in a simulated car, or a history student could explore a virtual reconstruction of ancient Rome.
These immersive experiences go beyond static visuals, offering learners opportunities for active participation and deeper understanding. Companies like Google Expeditions already provide VR field trips, highlighting the potential of this approach.
Improved Accessibility and Inclusivity Features
Accessibility is becoming increasingly critical in eLearning. Future versions of Captivate will likely incorporate more advanced accessibility features to ensure that learning materials are accessible to learners with diverse needs. This could involve improved support for screen readers, alternative text descriptions for images, customizable fonts and color schemes, and more sophisticated captioning and transcription tools. The rise of legislation like the Americans with Disabilities Act (ADA) underscores the importance of accessible eLearning, and Captivate’s future success depends on its ability to meet these evolving standards.
Companies are increasingly focusing on accessibility in software design, reflecting a growing societal awareness of the importance of inclusivity.
Streamlined Collaboration and Content Management
Collaboration is key in the creation of effective eLearning materials. Future iterations of Captivate might offer improved collaboration tools, allowing multiple authors to work simultaneously on a project. Imagine a system where authors can seamlessly share and merge content, track changes, and provide feedback in real-time. Integrated content management features could simplify the organization and version control of learning assets.
This would be particularly beneficial for large-scale eLearning projects involving multiple teams and contributors. The trend toward cloud-based collaboration tools is already influencing software development, suggesting that Captivate might incorporate similar features for enhanced team workflows.
Creating a Responsive Table in Captivate
So, you’ve built awesome eLearning content in Captivate, but your tables look…well, kinda clunky on different screen sizes? Let’s fix that. Creating responsive tables in Captivate involves leveraging HTML’s power directly within your project. It’s not as scary as it sounds!This section will walk you through designing a simple, yet effective, responsive HTML table that gracefully adapts to various screen sizes within your Adobe Captivate project.
We’ll focus on using basic HTML and CSS techniques, making it easy to implement and understand.
Responsive Table Structure
The key to a responsive table lies in using percentage-based widths for columns instead of fixed pixel values. This allows the table to dynamically adjust its column widths based on the available screen space. We’ll also use the `table-layout: fixed;` CSS property to ensure that columns maintain their relative widths even if the content within them varies in length.
This prevents columns from expanding excessively and disrupting the table’s layout.Here’s an example of an HTML table with four responsive columns that you can paste directly into a Captivate text caption or HTML object:
| Module | Topic | Duration | Assessment |
|---|---|---|---|
| Introduction to Captivate | Interface Overview | 30 minutes | Quiz |
| Interactive Content | Creating Quizzes | 45 minutes | Practice Exercise |
| Advanced Features | Responsive Design | 60 minutes | Project |
This code defines a table with four columns, each occupying 25% of the total table width. The `colgroup` element is used to define the column groups and their widths. The `thead` element contains the table header, and the `tbody` element contains the table rows. The example data shows a sample course structure. Remember to replace this with your own content!
Styling the Responsive Table (Optional)
While the basic HTML structure ensures responsiveness, you can enhance the table’s appearance using CSS. You can add styles within the `
This CSS code adds a simple black border to all table elements and ensures that borders collapse to avoid double borders between cells. Experiment with different styles to achieve the desired look and feel for your eLearning course.
Illustrating a Complex Process in Captivate
Illustrating complex processes effectively in eLearning requires a clear, step-by-step approach. Adobe Captivate, with its screen recording and annotation capabilities, is ideally suited for this task. By combining visual demonstrations with concise narration, learners can grasp intricate procedures much more easily than with text alone. Let's look at an example using network troubleshooting.
Troubleshooting a Network Connectivity Issue
This section details how to create a Captivate module illustrating the troubleshooting of a common network connectivity problem: a computer unable to access the internet. The module will use a combination of screen recordings, annotations, and narration to guide the learner through the process.The module begins with a brief introduction explaining the scenario: a user's computer is unable to connect to the internet.
The screen recording begins, showing the user's desktop with the familiar "No Internet Access" notification. The narration explains the problem and the steps the user will take to resolve it.
Step-by-Step Troubleshooting
First, the screen recording shows the user checking the physical connection of the ethernet cable or Wi-Fi signal strength. An annotation highlights the cable or Wi-Fi icon on the system tray. The narration explains that a loose cable or weak signal is a common cause of connectivity issues. If the problem persists, the recording shows the user opening the Network and Sharing Center.
An annotation circles the relevant icon. The narration explains the purpose of this step and guides the user to look for any error messages.Next, the screen recording shows the user checking the network adapter settings. Annotations highlight relevant fields within the settings, such as IP address, subnet mask, and default gateway. The narration emphasizes the importance of these settings and explains how incorrect configurations can prevent internet access.
The recording also shows how to check the status of the network adapter and any potential driver issues. Annotations clearly point out the relevant sections in the Device Manager. The narration explains the process of updating drivers if needed.Finally, if the problem still persists, the screen recording shows the user restarting their computer and their router/modem. Annotations highlight the power buttons of these devices.
The narration explains that restarting these devices can often resolve temporary network glitches. If the problem remains unsolved, the user is guided to contact their internet service provider. The narration suggests this step and provides contact information in the form of a clickable link or phone number displayed on the screen.
Visual Elements and Narration
Throughout the module, the narration is clear, concise, and easy to understand. The pace is deliberate, allowing learners ample time to follow along. Annotations are used sparingly but effectively, drawing attention to critical elements on the screen without overwhelming the learner. The screen recordings are high-quality and clearly show the steps involved. The entire process is broken down into easily digestible chunks, with regular checkpoints to ensure the learner understands each step before moving on.
The module concludes with a summary of the troubleshooting steps and a reminder to contact the internet service provider if the problem persists.
Outcome Summary
So, there you have it – a whirlwind tour of Adobe Captivate's capabilities! From simple quizzes to complex simulations, Captivate empowers you to craft truly engaging and effective eLearning experiences. By mastering its features and best practices, you can transform the way people learn, one interactive module at a time. Remember to check out those FAQs for even more helpful tips and tricks to get you started on your eLearning journey!
FAQ Resource
Is Adobe Captivate hard to learn?
Nah, it's pretty intuitive once you get the hang of it. There's a bit of a learning curve, but tons of tutorials and resources are available online.
What's the difference between Captivate and Articulate Storyline?
Both are popular eLearning authoring tools, but they have different strengths. Captivate excels at simulations and screen recordings, while Storyline is often preferred for its robust branching and character animation capabilities. It really depends on your specific needs.
Can I use Captivate on a Mac?
Yep! Adobe Captivate is available for both Windows and macOS.
How much does Adobe Captivate cost?
It's a subscription-based software, so you'll need to check Adobe's website for the most up-to-date pricing.
Can I create mobile-friendly courses with Captivate?
Absolutely! Captivate allows you to publish your projects for various devices, including smartphones and tablets.