Ableton Live, the wildly popular DAW (Digital Audio Workstation), has revolutionized music production. From its humble beginnings, it’s become a staple for electronic music artists and producers across genres, known for its intuitive workflow and powerful features. This exploration dives into Ableton Live’s history, core functionalities, and advanced techniques, comparing it to competitors and offering insights into maximizing its potential.
Table of Contents
We’ll cover everything from the basics of its Session and Arrangement views to mastering advanced techniques like Max for Live and intricate MIDI routing. We’ll also examine its impressive array of built-in effects and instruments, explore effective workflows for different genres, and troubleshoot common issues. Get ready to unlock the full power of Ableton Live!
Ableton Live’s History and Evolution
Ableton Live, a digital audio workstation (DAW) beloved by musicians and producers worldwide, boasts a rich history of innovation and adaptation. From its humble beginnings as a niche tool, it’s evolved into a powerhouse shaping the landscape of modern music production. Its journey reflects the broader changes in music technology, moving from hardware-centric workflows to the increasingly software-defined production environment we know today.Ableton Live’s development wasn’t a linear progression; instead, it’s a story of iterative improvements, responding to user feedback and technological advancements.
Each major version release brought significant feature additions, impacting workflow, sound design capabilities, and overall usability. Understanding this evolution helps appreciate the software’s current capabilities and its place in music history.
Major Version Updates and Feature Additions
The evolution of Ableton Live can be largely understood through its major version releases. Each update brought not only bug fixes and performance improvements, but also substantial changes that significantly altered the user experience and creative possibilities. Early versions focused on establishing a solid foundation of core features, while later versions focused on expanding capabilities and improving the overall user experience.
For example, early versions lacked many of the advanced features that are now considered standard, such as sophisticated MIDI editing tools and advanced warping capabilities.
User Interface Evolution Across Versions
The Ableton Live user interface has undergone a significant transformation over the years. Early versions presented a more spartan interface, reflecting the limitations of computer processing power and display technology at the time. The Session View, a key differentiator for Ableton, was present from the beginning, but its visual representation and functionality have been refined across versions. Later versions incorporated more sophisticated visual elements, improved color schemes, and more customizable layouts, resulting in a more intuitive and visually appealing experience.
The shift towards a more streamlined and visually consistent interface has made the software more accessible to a broader range of users, regardless of their technical expertise. This evolution can be seen as a response to the growing demand for intuitive and visually appealing software.
Timeline Illustrating Ableton Live’s Development and Market Impact
A timeline of Ableton Live’s development would show a clear trajectory from a relatively unknown DAW to a leading industry standard. Early versions, released in the late 1990s, established a strong foundation, while subsequent releases built upon this foundation, introducing groundbreaking features like its unique Session View and advanced audio warping capabilities. The software’s adoption by prominent artists and producers significantly contributed to its market impact.
The timeline would also illustrate how Ableton Live’s features responded to and influenced evolving trends in music production, particularly the rise of electronic music genres and the increasing importance of live performance elements in studio productions. The increasing sophistication of its features and its adoption by a broad user base highlight its lasting influence on the music production landscape.
Core Features and Functionality
Ableton Live’s power lies in its flexible and intuitive design, allowing for both linear and non-linear music production workflows. Its core functionality revolves around three primary views, each offering a unique perspective on your project, along with robust MIDI editing and audio handling capabilities. These features work together seamlessly to provide a comprehensive and creative environment for music production.
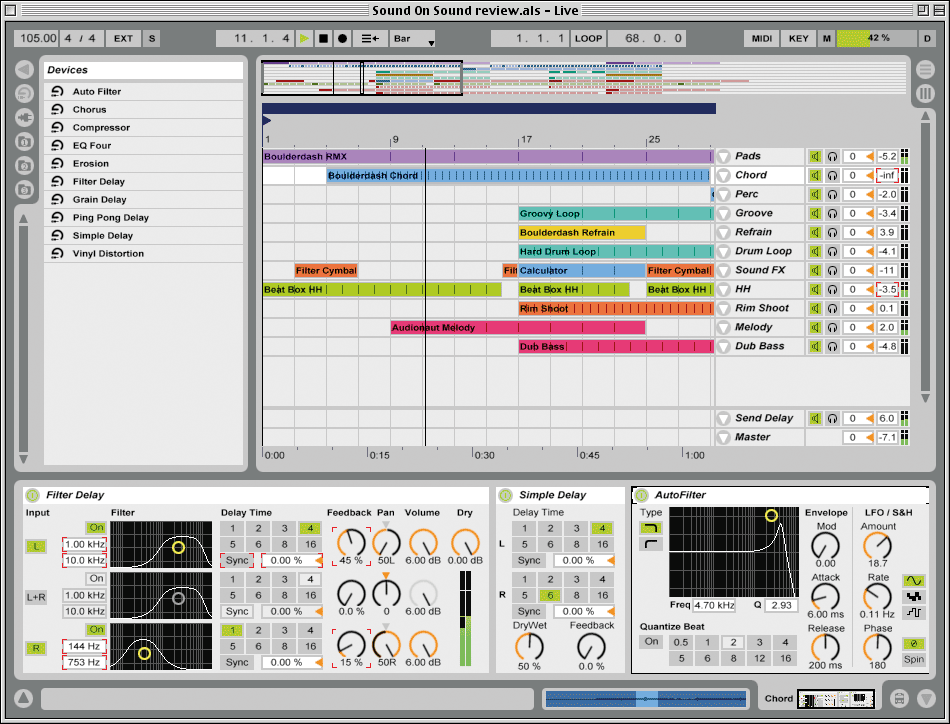
Ableton Live’s Views: Session, Arrangement, and More
Ableton Live presents your project through different views, each serving a distinct purpose in the creative process. The Session View is a grid-based environment ideal for improvisational composition and live performance. Clips, representing musical phrases or loops, are launched and arranged in a non-linear fashion, allowing for spontaneous arrangement and experimentation. In contrast, the Arrangement View provides a traditional linear timeline, perfect for arranging and editing your composition in a sequential manner.
This view allows for precise editing and manipulation of individual clips, audio tracks, and MIDI events. Beyond these two main views, Live also features a simpler Browser for navigating your samples, instruments, and project files, and a Mixer for controlling individual track levels, panning, sends, and effects. The ability to switch fluidly between these views empowers users to explore creative ideas quickly and refine their work with precision.
MIDI Editing Capabilities and Workflow
Ableton Live boasts a powerful and intuitive MIDI editor. Users can draw notes directly onto the piano roll, offering precise control over note pitch, velocity, and duration. Advanced features include the ability to edit MIDI CC data (controlling parameters of synthesizers and effects), automate parameters over time, and use various quantize settings to improve timing. The workflow is highly visual and efficient, with tools like clip stretching, note repetition, and velocity envelopes allowing for quick and effective MIDI manipulation.
For example, a user could easily create a complex drum beat by drawing individual notes, then using the velocity envelope to add dynamics and groove to the performance. This approach is significantly faster and more intuitive than many traditional DAWs.
Audio Recording and Processing Features
Live’s audio recording capabilities are robust and feature-rich. It supports various sample rates and bit depths, allowing for high-fidelity recordings. The software offers real-time audio effects processing, allowing users to apply effects directly during recording. This allows for creative experimentation and sound design possibilities. The built-in effects are diverse, ranging from basic EQ and compression to more specialized effects like reverb, delay, and distortion.
Furthermore, Ableton Live seamlessly integrates with third-party VST and AU plugins, expanding its processing capabilities significantly. For instance, a vocalist could record their performance with a compressor applied in real-time, ensuring a consistent and balanced recording, while simultaneously adding a subtle reverb to create a more spacious sound. This combination of real-time processing and plugin integration offers unmatched flexibility in audio production.
Ableton Live’s Strengths and Weaknesses Compared to Competitors
Ableton Live holds a unique position in the DAW landscape, often praised for its innovative workflow but also criticized for certain limitations. Comparing it to other popular DAWs like Logic Pro X and FL Studio reveals its strengths and weaknesses more clearly, highlighting where it excels and where it might fall short depending on a user’s specific needs and production style.
Ableton Live vs. Logic Pro X: Workflow and Feature Comparison
Ableton Live and Logic Pro X represent different approaches to music production. Logic Pro X, a long-standing industry standard, emphasizes a traditional linear arrangement workflow, while Ableton Live is renowned for its session view, allowing for a more non-linear, improvisational approach. This fundamental difference impacts how users approach composition, arrangement, and performance. Logic Pro X boasts a vast library of instruments, effects, and loops, making it a self-contained powerhouse for many producers.
Its MIDI editing capabilities are also exceptionally robust. Ableton Live, on the other hand, excels in its clip-based workflow, making it ideal for live performance and experimental composition. While its instrument and effect library is growing, it often relies on third-party plugins to match Logic Pro X’s comprehensive collection. The intuitive arrangement view in Logic Pro X makes it easier for beginners to learn traditional music arrangement methods, whereas Ableton Live’s session view might feel initially daunting to those accustomed to linear workflows.
Ultimately, the “better” DAW depends entirely on the user’s preferences and working style.
Ableton Live vs. FL Studio: Distinct Strengths in Different Areas
FL Studio, known for its ease of use and powerful pattern-based sequencer, targets a different user base than Ableton Live. FL Studio’s intuitive interface and strong focus on beat-making make it a popular choice for hip-hop, electronic dance music (EDM), and other genres emphasizing rhythmic complexity. Its lifetime license model is also attractive to many users. Ableton Live, while capable of producing excellent beats, leans more towards a broader range of genres and often prioritizes a more flexible, less rigid approach to arrangement.
Ableton’s session view is less structured than FL Studio’s piano roll and pattern-based approach, providing more freedom for improvisation and experimentation. FL Studio shines in its powerful automation features and its incredibly smooth workflow for creating complex rhythmic patterns, while Ableton’s strength lies in its flexible session view and its seamless integration with live performance setups. Both DAWs have robust plugin support, but their strengths lie in different areas of music production.
Ableton Live’s Primary Advantages and Disadvantages Compared to Other DAWs
Ableton Live’s primary advantage lies in its unique session view and its emphasis on a non-linear, improvisational workflow. This makes it particularly well-suited for live performance, experimental music production, and workflows that prioritize flexibility and spontaneity. The ability to quickly arrange and rearrange clips, combined with powerful MIDI capabilities, offers a level of creative freedom not easily replicated in other DAWs.
However, a significant disadvantage for some users is the steeper learning curve associated with understanding the session view and mastering its unique approach to arrangement. The smaller built-in instrument and effect library compared to some competitors, such as Logic Pro X or Studio One, also represents a potential drawback, although this is easily mitigated by utilizing the vast array of third-party plugins available.
Furthermore, while Ableton Live’s audio editing capabilities are solid, they aren’t as comprehensively featured as some other DAWs. The cost of Ableton Live can also be a barrier to entry for some users compared to more affordable alternatives.
Workflow and Best Practices
So, you’ve got Ableton Live, you’re ready to make some fire house tracks, but where do you even begin? Efficient workflow is key to avoiding frustration and maximizing your creative output. This section Artikels a streamlined approach to house music production and mastering in Ableton, plus some pro tips for managing even the most ambitious projects.
Efficient House Music Track Creation Workflow in Ableton Live
This workflow focuses on a linear approach, ideal for beginners. Experienced producers may adapt this to their preferred non-linear methods. The key is consistency and a well-defined process.
- Arrangement View Setup: Start by setting up your Arrangement View. Create master tracks for your drums, bass, synths, and effects. Consider using color-coding for better visual organization.
- Drum Programming: Begin with the drums. Use MIDI clips to program your kick, snare, hi-hats, and percussion. Experiment with different patterns and groove quantization to find a solid foundation.
- Bassline Creation: Next, create your bassline. Use a synthesizer or sample a bass sound. Focus on creating a compelling rhythmic and melodic element that complements your drums.
- Synth Melodies and Chords: Develop your synth melodies and chords. Layer different sounds to create texture and depth. Experiment with different synth parameters and effects.
- Arrangement and Structure: Arrange your elements into a cohesive structure. Think about the intro, verse, chorus, breakdown, and outro. Use automation to create dynamic changes in your track.
- Mixing: Once the arrangement is complete, start mixing. Pay attention to levels, panning, EQ, and compression. Use reference tracks to ensure your mix is balanced.
- Mastering Preparation: Prepare your track for mastering. This might include exporting your stems for separate mastering or preparing a final mixdown.
Step-by-Step Guide for Mastering a Song in Ableton Live Using Built-in Tools
Ableton Live offers surprisingly powerful mastering capabilities. This process leverages its built-in effects to achieve a professional-sounding master.
- Gain Staging: Ensure your track’s overall level is appropriate before applying any mastering effects. Avoid clipping at all stages.
- EQ: Use a subtle EQ to address any frequency imbalances. Focus on gentle adjustments rather than drastic cuts or boosts.
- Compression: Apply gentle compression to glue the track together and control dynamics. Aim for a natural sound, avoiding over-compression.
- Stereo Widening (Optional): Carefully use stereo widening to enhance the spaciousness of your track. Overdoing this can lead to phase issues.
- Limiter: Use a limiter as the final stage to maximize the loudness of your track without introducing distortion. Pay close attention to the gain reduction meter.
- Export: Export your mastered track at the appropriate sample rate and bit depth (typically 44.1 kHz/16-bit or 48 kHz/24-bit for high-quality masters).
Best Practices for Managing Large Projects and Preventing Crashes in Ableton Live
Large Ableton projects can be resource-intensive. These practices help maintain stability and efficiency.
Regularly saving your work is paramount. Ableton’s autosave feature is helpful, but manual saves are crucial, especially during intensive editing sessions. Consider saving different versions of your project as you progress.
Consolidating audio tracks reduces CPU load. This combines multiple MIDI clips and audio clips into a single audio file, simplifying the project and improving performance. Freezing tracks achieves a similar effect by rendering them to audio. This renders audio from all tracks you select, saving CPU power. However, you lose the ability to edit MIDI data once frozen.
Using efficient sample management techniques helps to prevent crashes and improve performance. Organize your samples into folders, and avoid using excessively large or uncompressed samples. Using a high-quality, well-organized sample library is a great asset. Consider employing techniques such as sample rate conversion to reduce file size and improve performance.
Regularly consolidating and deleting unused files, especially those outside of the project’s main directory, can maintain system health. This prevents bloat and maintains the responsiveness of your system and the project itself.
Ableton Live’s Effects and Instruments
Ableton Live boasts a powerful suite of built-in effects and instruments, crucial for shaping sounds and creating entire tracks. These tools, ranging from simple EQs to complex synthesizers, are a significant part of what makes Live so popular among producers across various genres. Understanding their capabilities is key to unlocking Live’s full creative potential.
Built-in Effects and Their Functionality
Ableton’s effects are categorized into several types, each serving a distinct purpose in sound design and mixing. These categories aren’t mutually exclusive; many effects can be used in multiple ways depending on the creative vision.
Dynamics Processing: These effects manage the volume of audio signals. Examples include compressors (like the Compressor, Glue Compressor), limiters (Limiter), expanders, and gates (Gate). Compressors even out dynamic range, while limiters prevent clipping. Expanders boost quieter signals, and gates cut off signals below a certain threshold. A creative use might be using a compressor to add punch to a drum loop, or a gate to eliminate unwanted noise from a vocal recording.
EQ and Filtering: These effects shape the frequency spectrum of a sound. Ableton offers parametric EQ Eight (a powerful 8-band parametric EQ), EQ Eight (a simpler version), and various filters (like the Auto Filter). EQs boost or cut specific frequencies, while filters remove or emphasize certain frequency ranges. A common use is sculpting a bassline by cutting muddiness in the low-mids, or boosting the high frequencies of a snare drum for clarity.
The Auto Filter, with its LFO-driven cutoff, can create pulsating, rhythmic effects.
Modulation Effects: These effects introduce changes to the audio signal, adding movement and character. Examples include phasers (Phaser), flangers (Flanger), choruses (Chorus), and delays (Delay). These effects can create a sense of space, widen the stereo image, or add rhythmic interest. A creative use would be using a chorus to thicken a lead vocal, or a delay to create a spacious reverb-like effect on a guitar part.
Reverb and Delay: These effects simulate the acoustic environment of a sound. Reverb (Reverb) adds ambience and space, while delay (Delay) creates echoes. Different reverb algorithms simulate different spaces, from small rooms to large halls. Delay can be used for rhythmic effects or to create atmospheric textures. For example, a large hall reverb on a vocal could add grandeur, while a short delay on a drum could add punch.
Distortion and Saturation: These effects add harmonic richness and grit to a sound. Examples include Overdrive, Saturator, and Distortion. They can be used subtly to add warmth, or aggressively to create heavy distortion. A creative use might be subtly saturating a bassline to add warmth, or heavily distorting a guitar to create a fuzz effect.
Built-in Instruments and Their Capabilities
Ableton Live includes a variety of virtual instruments, each with unique characteristics and sound design possibilities.
Operator: This is a powerful FM synthesizer capable of generating complex and evolving sounds. It allows for extensive control over the synthesis process, including modulation routing and various waveform shapes. It’s used for creating everything from lush pads to aggressive leads. Think of the iconic sounds in many electronic music genres – Operator can get you there.
Sampler: This instrument allows users to load and manipulate audio samples. It offers features like time-stretching, pitch-shifting, and looping, enabling creative manipulation of any audio material. It can be used to create everything from drum kits to melodic instruments. You can easily chop and manipulate a vocal sample into a rhythmic sequence, for instance.
Simpler: A simpler version of the Sampler, ideal for quick sample manipulation. It lacks some advanced features of the Sampler but offers a streamlined workflow for basic sample playback and manipulation. Perfect for quickly loading and playing a one-shot sound.
Impulse: This is a drum sampler specialized for creating and manipulating drum kits. It offers features like individual tuning and envelope control for each drum sound, along with a flexible routing system. This instrument is essential for crafting intricate and dynamic drum grooves.
Analog: This instrument emulates classic analog synthesizers, offering a warm and versatile sound. It features various oscillator types, filters, and effects, making it a powerful tool for creating classic synth sounds. Its warmth is perfect for creating vintage-inspired sounds or adding a classic touch to modern productions.
Creative Uses Across Genres
Ableton’s native effects and instruments are incredibly versatile and adaptable to various genres.
Electronic Dance Music (EDM): Operator can be used to create complex basslines and leads, while the Sampler can be used to chop and manipulate drum samples for unique rhythms. Reverb and delay can be used to create a spacious soundscape. The use of automation and effects to create dynamic changes is common.
Hip Hop: The Sampler is essential for creating drum kits and manipulating vocal samples. Distortion and saturation can be used to add grit to the sound. EQ can be used to sculpt the individual elements of a track.
Pop: Analog can be used to create warm and lush pads, while the Chorus and Reverb can be used to create a wide and spacious sound. EQ can be used to ensure clarity and balance.
Rock: Amp simulation plugins can be used to create realistic guitar tones, while delay and reverb can be used to create atmosphere. Distortion and overdrive can be used to create aggressive guitar sounds. The Sampler can also be used to create unique drum sounds.
Third-Party Plugins and Integrations

Ableton Live’s power isn’t just in its core features; it’s massively boosted by the vast ecosystem of third-party plugins. These add-ons, ranging from virtual instruments to effects processors, drastically expand Live’s sonic capabilities and workflow options, letting you tailor your DAW to your specific needs and creative vision. Think of it like this: Ableton gives you the engine; third-party plugins are the custom parts that make it a true performance machine.The sheer number of available plugins can be overwhelming, though.
Effective management is key to preventing a chaotic workflow. A well-organized plugin library makes finding the right tool quick and efficient, allowing you to focus on the music, not the searching.
Popular Third-Party Plugins
Many plugins have become industry standards, integrated into countless successful tracks. Examples include Native Instruments’ Komplete suite (offering a vast array of synths, samplers, and effects), various offerings from Spectrasonics (like Omnisphere, known for its massive sound library and versatile synthesis), and the versatile effects from Waves Audio. Izotope also provides a suite of mastering and mixing tools that seamlessly integrate into Ableton’s workflow.
These are just a few; the list of excellent plugins is extensive and constantly growing. Choosing the right ones depends on your specific musical style and needs. For example, a producer focusing on electronic dance music might prioritize synths like Serum or Massive, while someone working on acoustic music might focus on high-quality reverb and delay plugins.
Managing and Organizing Third-Party Plugins
Effective plugin management is crucial for productivity. Ableton Live allows for folder organization within its plugin browser. Creating logical folders based on plugin type (synths, effects, etc.) or sound character (leads, basses, pads) significantly improves workflow. Many producers also use color-coding to visually distinguish plugin categories, adding another layer of organization. Beyond Ableton’s built-in organization tools, some producers utilize external database management systems to track their entire plugin library, providing even more granular control and search capabilities.
Regularly auditing your plugin collection, deleting unused or underperforming plugins, keeps your library lean and efficient.
Advantages of Using Third-Party Plugins
The advantages of using third-party plugins are numerous. Firstly, they dramatically expand your sonic palette. Live’s built-in instruments and effects are excellent, but third-party options often offer unique sounds and processing capabilities that you won’t find anywhere else. Secondly, they can significantly streamline your workflow. Specialized plugins can automate complex tasks, saving time and allowing you to focus on the creative aspects of music production.
Thirdly, they provide access to cutting-edge technology and innovative sound design techniques developed by specialized plugin developers. For example, a granular synth plugin might offer sound design capabilities far beyond those available in Live’s native instruments, enabling entirely new sonic textures and possibilities. Finally, the use of high-quality third-party plugins can elevate the overall quality and professionalism of your productions.
Audio Manipulation Techniques in Ableton Live
Ableton Live offers a powerful suite of tools for manipulating audio, going far beyond simple editing. Its flexibility allows for creative sound design, dynamic arrangement, and the seamless integration of samples into your productions. This section will explore some key techniques for working with audio within the DAW.
Warping Audio for Time-Stretching and Pitch-Shifting
Ableton’s warping engine is a game-changer. It allows you to non-destructively stretch or compress audio clips in time without significantly degrading the audio quality. You can choose from various warping modes, each offering different results. “Beats” mode is ideal for rhythmic material, automatically detecting beats and preserving timing. “Tempo” mode is useful for melodic or harmonic content, maintaining pitch relationships.
“Complex” mode offers the most flexibility, allowing for fine-grained control over the warping process, but requires more manual adjustment. By adjusting the warp markers, you can fine-tune the warping to achieve the desired effect, whether it’s creating a slowed-down, ethereal vocal or a sped-up, chipmunk-like effect. Experimenting with different warping modes and marker placement is key to mastering this powerful feature.
Ableton Live’s a killer DAW, right? I’m always blown away by the intricate code behind its intuitive interface. Thinking about how much work goes into that makes me appreciate the skills of a software engineer who can build such complex and creative tools. Seriously, the audio routing alone is mind-blowing; it’s amazing what you can do with Ableton.
For example, you might use “Beats” mode to perfectly sync a vocal sample to a new tempo, or “Tempo” mode to create a dramatic pitch shift while preserving the melodic integrity of a guitar riff.
Using Automation Clips to Create Dynamic Effects and Transitions
Automation clips are incredibly versatile tools in Ableton Live. They allow you to control virtually any parameter of a track over time, creating dynamic changes in volume, panning, effects sends, and more. Imagine smoothly fading a synth pad in and out, creating a swelling effect, or automating a filter cutoff to create a rhythmic pulse. The possibilities are endless.
To create an automation clip, simply right-click on a parameter and select “Create Automation Clip.” Then, draw in your automation using the mouse, controlling the parameter’s value over time. You can create complex automation patterns with ease, and even use MIDI controllers to record automation in real-time for a more organic feel. For instance, automating the reverb send on a vocal track can create a sense of space and depth that gradually increases and decreases as the song progresses.
Creating Custom Instruments from Audio Samples Using Ableton’s Sampler
Ableton’s Sampler is a robust instrument that allows you to turn any audio file into a playable instrument. Simply drag and drop your audio sample into the Sampler device. From there, you can slice the sample into individual notes, adjust its pitch and timing, add effects, and much more. You can even create complex multi-sample instruments by layering different sounds.
The Sampler offers advanced features like time-stretching, looping, and granular synthesis, allowing for extensive sound manipulation. Consider creating a drum kit from individual drum hits, or turning a vocal sample into a melodic instrument. The Sampler’s flexibility makes it a powerful tool for both sound design and sample-based music production. For example, you could load a field recording of birdsong, slice it into individual notes, and then use the Sampler’s effects to create a unique and atmospheric melody.
Creating Different Music Genres with Ableton Live
Ableton Live’s flexibility makes it a powerful tool for crafting music across a wide range of genres. Its intuitive workflow, extensive effects library, and vast third-party plugin ecosystem empower producers to explore diverse sonic landscapes and experiment with various production techniques. This section will delve into the practical application of Ableton Live in creating techno and trap music, and briefly touch upon its use in other genres.
Techno Track Production Workflow
Producing a techno track in Ableton Live typically involves a structured approach focused on building a compelling rhythmic foundation and layering atmospheric textures. The process often begins with a solid kick drum and a driving bassline, establishing the track’s groove. Subsequently, percussion elements, melodic lines, and sound effects are added to create depth and complexity.
- Kick Drum and Bassline: Start by programming a powerful kick drum using a sample or a synth. Simultaneously, create a driving bassline, either using a subtractive synth or a bass sample. Experiment with different rhythmic patterns and variations to establish a compelling groove. Consider using Ableton’s built-in compressor to ensure a tight and punchy sound.
- Percussion and Hi-Hats: Layer additional percussion elements, such as snares, claps, and hi-hats, to enhance the rhythmic complexity. Use Ableton’s various drum rack features to easily arrange and manipulate the different drum sounds. Experiment with different velocity and panning to create a wider soundscape.
- Atmospheric Textures: Introduce atmospheric pads and textures using synths, samples, or even processed field recordings. Experiment with reverb, delay, and other effects to create a sense of space and depth. Consider using Ableton’s “Operator” synth for creating complex evolving pads.
- Melodic Elements: Add melodic elements using synths, samplers, or even MIDI instruments. Keep the melodies relatively simple and repetitive, focusing on creating a hypnotic and engaging atmosphere. Consider using Ableton’s “Autofilter” effect to create dynamic movement within the melodic lines.
- Sound Design and Effects: Utilize Ableton’s extensive library of effects, including distortion, EQ, and modulation effects, to shape and sculpt the individual sounds and create a cohesive mix. Experiment with different effects chains to achieve unique sonic characteristics.
- Arrangement and Mixing: Arrange the elements into a cohesive structure, building intensity and creating dynamic variations throughout the track. Pay close attention to the mix, ensuring that all elements are balanced and well-defined. Use Ableton’s mixer and routing capabilities for detailed control.
Trap Beat Production in Ableton Live
Creating a trap beat often revolves around constructing a compelling drum pattern, incorporating 808 bass, and layering melodic elements with heavy use of effects. The process emphasizes the interplay of heavy 808s, crisp hi-hats, and catchy melodic phrases.
- Drum Programming: Begin by programming a foundational drum pattern using samples or drum synths. Focus on the kick, snare, and hi-hat, experimenting with different rhythmic variations and swing feel. Commonly used sounds include 808s, crisp snares, and fast hi-hats with a swung feel.
- 808 Bass: Add a deep 808 bassline, typically using a sub-bass synth or a sampled 808 sound. Adjust the tuning, EQ, and compression to achieve a powerful and impactful low-end. Use Ableton’s “Glue Compressor” to tightly bind the 808 to the kick drum.
- Melodic Elements: Incorporate melodic elements, typically using synths, samplers, or MIDI instruments. Commonly used melodic elements in trap music include simple, catchy melodies often utilizing major and minor chords with heavy use of reverb and delay.
- Effects Processing: Utilize Ableton’s effects, such as reverb, delay, distortion, and saturation, to enhance the sonic characteristics of each element. Heavy use of reverb and delay can create a spacious and atmospheric soundscape, while distortion and saturation add grit and punch.
- Sound Selection and Arrangement: Carefully select sounds that fit the overall vibe of the track. Arrange the elements in a way that creates a dynamic and engaging listening experience. Pay close attention to the flow and transition between different sections.
Ableton Live’s Application in Other Genres
Ableton Live’s versatility extends beyond techno and trap. Its capabilities allow for the creation of a diverse range of music. For instance, ambient music can be produced using long, evolving soundscapes created with synths and granular synthesis, incorporating extensive use of reverb and delay. Electronic music often utilizes Ableton’s MIDI sequencing and automation features to craft complex rhythmic patterns and melodic progressions.
Hip-hop production benefits from Ableton’s powerful sampling capabilities, allowing producers to chop and manipulate samples to create unique beats and rhythms.
Advanced Techniques and Workflows

Ableton Live’s power truly shines when you delve beyond its basic features. Mastering advanced techniques unlocks a level of creative control and efficiency that dramatically improves your workflow and expands your sonic palette. This section explores some key areas where you can significantly boost your production capabilities.
Max for Live Functionality Extension
Max for Live is a game-changer. It’s a visual programming environment integrated directly into Ableton, allowing you to create custom devices, effects, and instruments. This means you can build tools tailored precisely to your needs, from unique modulation effects and generative sequencers to complex MIDI processors and interactive visualizations. For example, you could build a device that dynamically adjusts reverb based on the intensity of the drums, or create a custom synth with a completely unique sound design workflow.
The possibilities are virtually limitless, constrained only by your programming skills (or your willingness to learn!). Learning Max for Live opens doors to a whole new world of creative possibilities within Ableton.
Advanced MIDI Routing Techniques
Advanced MIDI routing is essential for complex setups and creative control. Instead of simply sending MIDI data from a keyboard to a synth, you can use Ableton’s routing capabilities to create intricate signal flows. This involves using MIDI effects like MIDI Arpeggiators, Note Repeaters, and Chord Processors to manipulate the data before it reaches its destination. You can also use multiple MIDI tracks, external MIDI devices, and even Max for Live devices to create complex, multi-layered MIDI chains.
A practical application could be routing MIDI from a drum machine to trigger both a sampler and a granular synth, simultaneously controlling both with different MIDI effects. This enables intricate layering and sound design possibilities that would be impossible with basic MIDI routing.
Custom MIDI Controller Creation
Creating custom MIDI controllers adds a level of tactile control that’s hard to match with a mouse and keyboard. This involves using software like Max for Live or third-party applications to map controls to specific parameters within Ableton. You can then use a variety of hardware controllers, from DIY projects using Arduino boards to professional MIDI controllers, to interact with your project.
For instance, you might design a controller with knobs to manipulate filter cutoff and resonance, faders for volume, and buttons for triggering clips. This direct, hands-on interaction provides a more intuitive and immediate workflow, accelerating your creative process and allowing for expressive performance control. Custom controllers can significantly enhance both your production and live performance capabilities.
Troubleshooting Common Ableton Live Issues
Let’s face it, even the most seasoned Ableton Live users encounter frustrating glitches from time to time. Whether it’s a sudden audio dropout during a crucial mixdown or a stubborn plugin conflict derailing your creative flow, knowing how to diagnose and fix these problems is essential. This section dives into common Ableton Live issues and offers practical solutions to get you back on track.
Audio Dropouts and Glitches, Ableton live
Audio dropouts, those dreaded moments of silence or distorted sound, can stem from several sources. Often, the culprit is insufficient processing power or buffer size settings. A low buffer size demands more processing power, increasing the likelihood of dropouts, especially with complex projects. Conversely, a high buffer size introduces latency, delaying audio playback, which can hinder real-time performance.
Finding the sweet spot involves experimenting with buffer size adjustments within Ableton’s preferences, observing the effects on both audio performance and latency. Additionally, ensuring your audio interface drivers are up-to-date and correctly configured is crucial. Overloaded CPU or RAM can also cause dropouts; closing unnecessary applications and freeing up system resources can significantly improve performance. Lastly, corrupted audio files or damaged hard drives can contribute to these issues; verifying file integrity and hard drive health is recommended.
Plugin Conflicts and Instability
Plugin conflicts are another common headache. Incompatible plugins, outdated versions, or corrupted plugin files can lead to crashes, freezes, or unexpected behavior. Resolving these issues involves systematically identifying the problematic plugin. One approach is to disable plugins one by one, restarting Ableton after each disable to pinpoint the culprit. Updating plugins to their latest versions often resolves compatibility issues.
If a specific plugin consistently causes problems, consider seeking a replacement or contacting the plugin developer for support. Additionally, ensure your plugins are compatible with your version of Ableton Live. Finally, rescanning your plugins within Ableton’s preferences can help resolve issues stemming from corrupted plugin data.
Optimizing Ableton Live Performance
Optimizing Ableton Live’s performance hinges on maximizing your computer’s capabilities. Start by ensuring your system meets Ableton’s minimum requirements and ideally exceeds them. This means investing in a computer with sufficient processing power (CPU), ample RAM, and a fast storage drive (SSD is highly recommended). Disable unnecessary background applications and processes to free up system resources. Consider consolidating your project files into a single, well-organized folder to reduce disk access time.
Utilizing Ableton’s freeze and flatten functions can reduce CPU load by rendering tracks to audio, especially useful for heavily processed tracks or complex instrument patches. Finally, regularly defragging your hard drive (if using an HDD) can improve performance.
Preventing Data Loss and Ensuring Project Stability
Data loss is a nightmare for any producer. To prevent this, religiously save your work frequently – the “autosave” feature is your friend, but don’t rely on it solely. Employ a robust backup strategy, using external hard drives or cloud storage to create regular backups of your entire Ableton project folder. Consider version control systems like Git for collaborative projects or managing larger projects where many changes are made over time.
Avoid using excessively long file names or special characters in your project files and folder names to prevent unexpected issues. Furthermore, periodically check your hard drive for errors and ensure it’s properly formatted to avoid data corruption.
The Ableton Live Community and Resources
Ableton Live boasts a vibrant and supportive community, crucial for both beginners navigating its complexities and seasoned pros seeking inspiration and collaboration. This network extends beyond simple user support, fostering creativity and innovation through shared knowledge, tutorials, and collaborative projects. Access to this community and its resources is vital for maximizing your Ableton Live experience.
The strength of the Ableton Live community lies in its diverse range of resources and the collective expertise of its members. From dedicated forums to online courses, a wealth of learning opportunities exists for users of all skill levels. This section will highlight key online communities, valuable learning resources, and influential figures within the Ableton Live ecosystem.
Prominent Online Communities and Forums
The Ableton Live community thrives online, with several key platforms facilitating communication and knowledge sharing. These forums provide spaces for users to ask questions, share tips and tricks, showcase their work, and engage in discussions about various aspects of Ableton Live. One of the most popular is the official Ableton forum, offering direct access to Ableton staff and a vast library of user-generated content.
Additionally, Reddit’s r/ableton subreddit is a highly active community with a wide range of discussions, from beginner questions to advanced techniques. Other platforms, including dedicated Facebook groups and Discord servers, offer specialized niches within the community, catering to specific genres or interests. These platforms foster a sense of collaboration and mutual support, allowing users to learn from each other’s experiences and insights.
Resources for Learning Ableton Live
Learning Ableton Live effectively involves utilizing a variety of resources tailored to different learning styles and skill levels. Ableton itself provides comprehensive documentation, including detailed manuals and video tutorials, directly on their website. Numerous third-party platforms offer structured courses, ranging from beginner-friendly introductions to advanced workshops covering specific techniques and workflows. Platforms like Udemy, Coursera, and Skillshare host a wide selection of Ableton Live courses, often taught by experienced producers and sound designers.
YouTube is also an invaluable resource, featuring countless free tutorials covering every aspect of Ableton Live, from basic operation to advanced sound design. These resources, combined with the active community support, provide a comprehensive learning pathway for users of all skill levels.
Influential Ableton Live Users and Their Contributions
Many individuals have significantly impacted the Ableton Live community through their tutorials, plugins, and creative projects. While naming every influential user would be impossible, several figures consistently stand out for their contributions. For example, many well-known electronic music producers use Ableton Live extensively and often share their workflows and techniques through online tutorials and workshops. These producers often demonstrate innovative approaches to sound design, mixing, and mastering within Ableton Live, inspiring other users and pushing the boundaries of what’s possible with the software.
Furthermore, many independent developers have created high-quality third-party plugins and instruments specifically for Ableton Live, expanding its functionality and creative potential. These developers often engage actively within the community, offering support and sharing their knowledge. Their contributions have significantly enriched the Ableton Live ecosystem, making it a more versatile and powerful tool for music production.
Last Point
Whether you’re a seasoned pro or just starting your musical journey, Ableton Live offers a versatile and powerful platform for creative expression. Its unique workflow, combined with a vast library of built-in tools and a thriving community, makes it an incredibly rewarding DAW to master. From crafting intricate soundscapes to producing polished tracks, Ableton Live empowers you to bring your musical vision to life.
So, dive in, experiment, and unleash your creativity!
FAQ Guide
Is Ableton Live good for beginners?
Absolutely! While it has advanced features, Ableton Live’s intuitive interface and numerous tutorials make it accessible to beginners. The Session View, in particular, is great for experimenting and arranging ideas.
How much does Ableton Live cost?
Ableton Live comes in different versions (Intro, Standard, Suite) with varying price points. Check Ableton’s website for the most up-to-date pricing.
What are the system requirements for Ableton Live?
System requirements vary depending on the version of Ableton Live. Consult Ableton’s website for the minimum and recommended specs for your chosen version.
Can I use Ableton Live on a Mac and a PC?
Yes, Ableton Live is available for both macOS and Windows operating systems.
What’s the difference between Ableton Live Suite and Standard?
Suite includes more instruments, effects, and Max for Live, offering expanded creative possibilities compared to the Standard version.